It’s been six years since we first created our very popular video tutorial on ‘How to install a Static HTML (iframe) tab’ as part of our series on social media marketing. However, a lot has chance since then and we thought it was time to bring our advice up-to-date based on the features and tools available currently. Let’s say you have a Facebook Business Page which you are managing on a regular basis but you would like provide additional information to your visitors, custom Facebook Tabs provide the perfect way to do this. The problem is that it’s somewhat more difficult now than it was back in 2011.
In the updated post below, we’ll explain why a business might decide to add Facebook Tabs, how they can be used and a simple set of steps for installing them on your Facebook Page.
Editor’s Note: This post was originally published in December 2011 based on the tools available within Facebook at the time. The process outlined in our original video will no longer work but the option to add static HTML tabs or Welcome Pages in Facebook is still available, so we have decided to update the article for freshness, accuracy and comprehensiveness.
Why install a Facebook custom tab?
Custom tabs provide businesses with the flexibility to show custom content within their Facebook Page to accompany the default tabs available, such as Home, Services, Reviews, About, Events, Videos, etc.
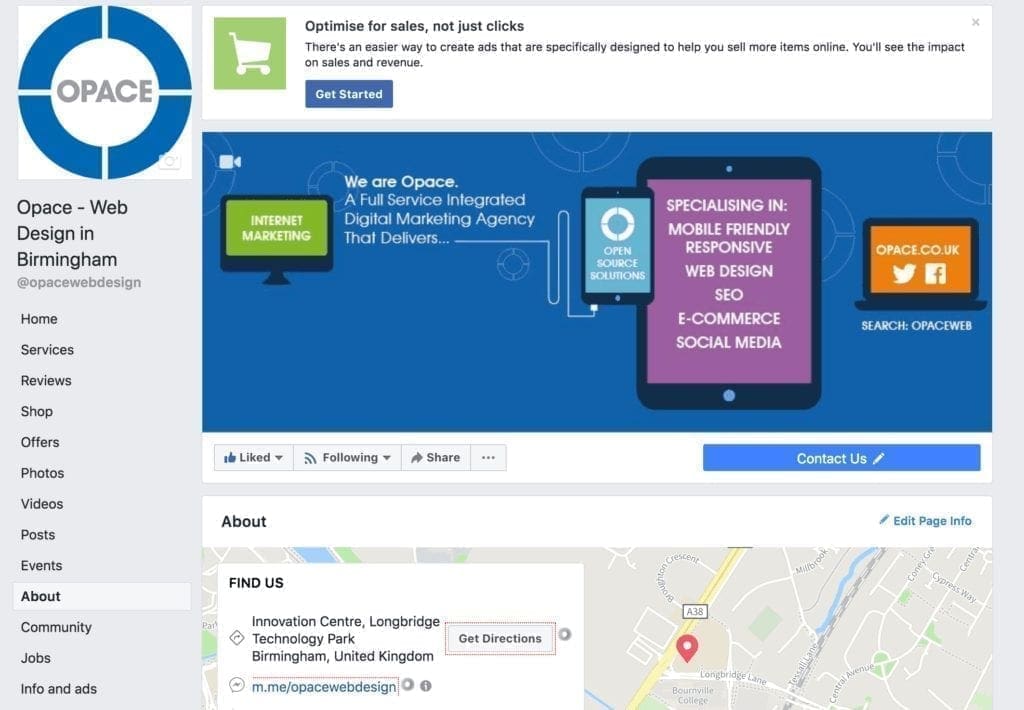
So, why add custom Facebook tabs? Quite simply, these give you a way to display custom content on you Page.
How Facebook tabs can be used?
There are lots of ways you can use custom Facebook tabs. For example, you can show visitors a custom welcome page rather than your Wall or one of the default tabs available when they first land on your Business Page. You could also chose to display a promotional campaign (e.g.”Likes”), an offer or incentive, PDF brochure, eBook, subscription, T&Cs, customer testimonials, or other form of informational content or media. Much like with a standard iframe, this custom content is externally hosted, meaning you are not restricted by the features available from Facebook and you have the flexibility to display any kind HTML or media. This has the potential to transform your page and digital marketing strategy
Please note: An important caveat here is that the content must be loaded from a secure “HTTPS” URL which uses an SSL certificate. Otherwise Facebook will not allow you to install the tab. On a positive note, SSL certificates are freely available through the Let’s Encrypt initiative and you should be able to set this up fairly easily via your web host.
Simple steps for installing custom tabs on your Facebook Page
Sadly, you can no longer do this by searching from within Facebook.
Step 1 – Log in to the Facebook App dashboard
Firstly, you will need to log in to the Facebook App dashboard using your normal Facebook login details: https://developers.facebook.com/
Step 2 – Click Add a New App
Next, you will need to click the Add New App button and then enter a name and email address for the App when the popup box appears, completing any security steps promoted:
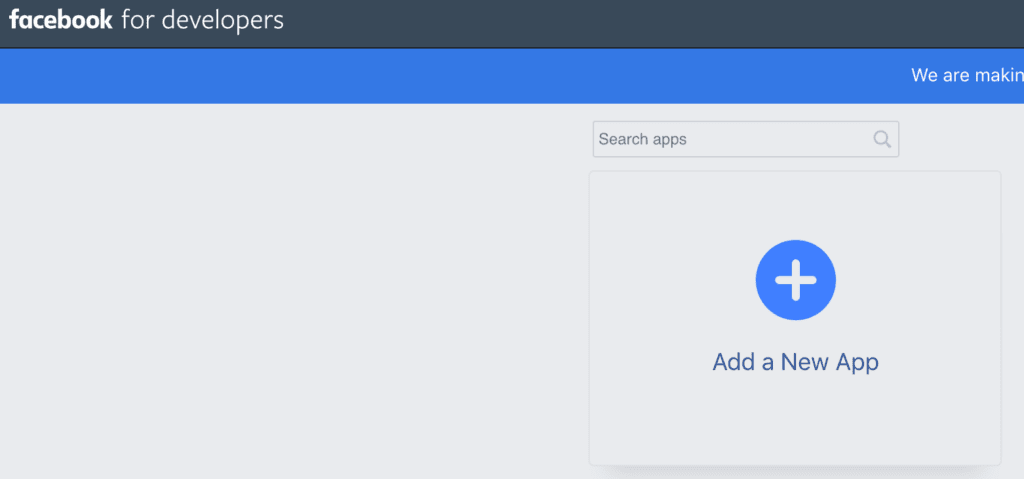
Click Add a New App
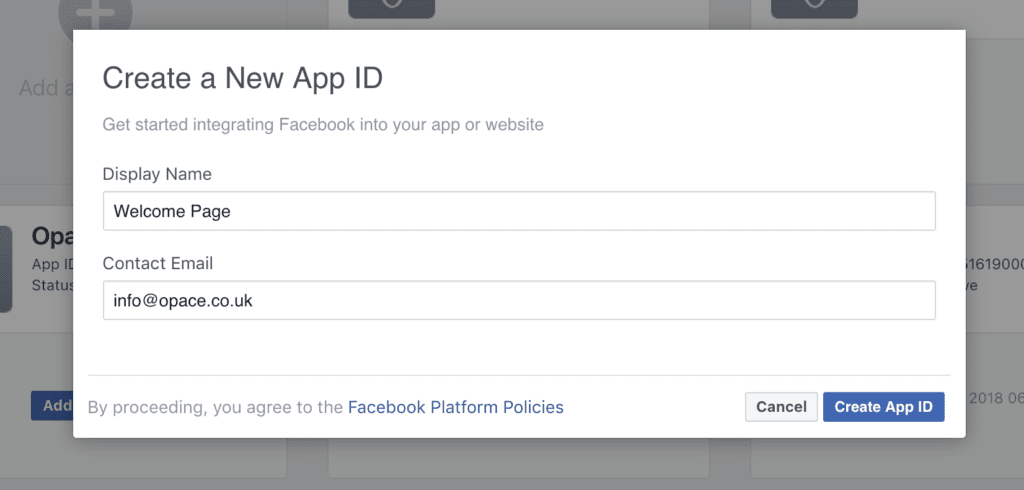
Give your App a Display Name and email address
Step 3 – Click Settings > Basic, then Add Platform
The next step is to click Settings > Basic, and then Add Platform:
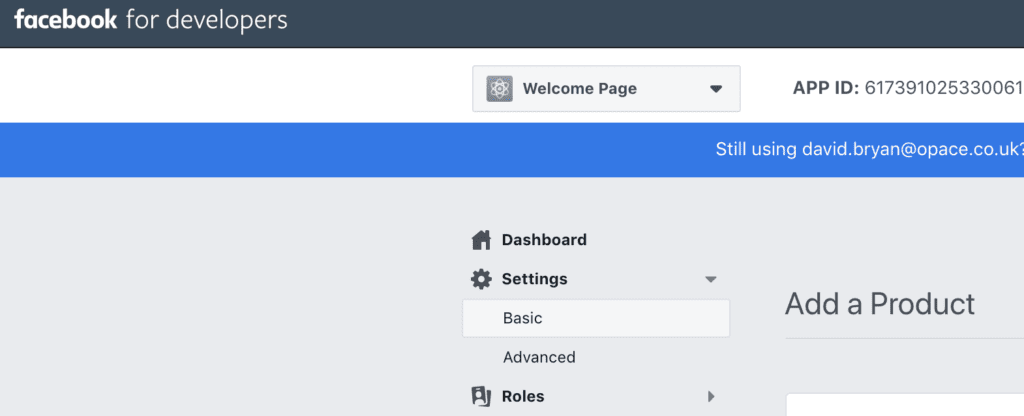
Go to Basic Settings
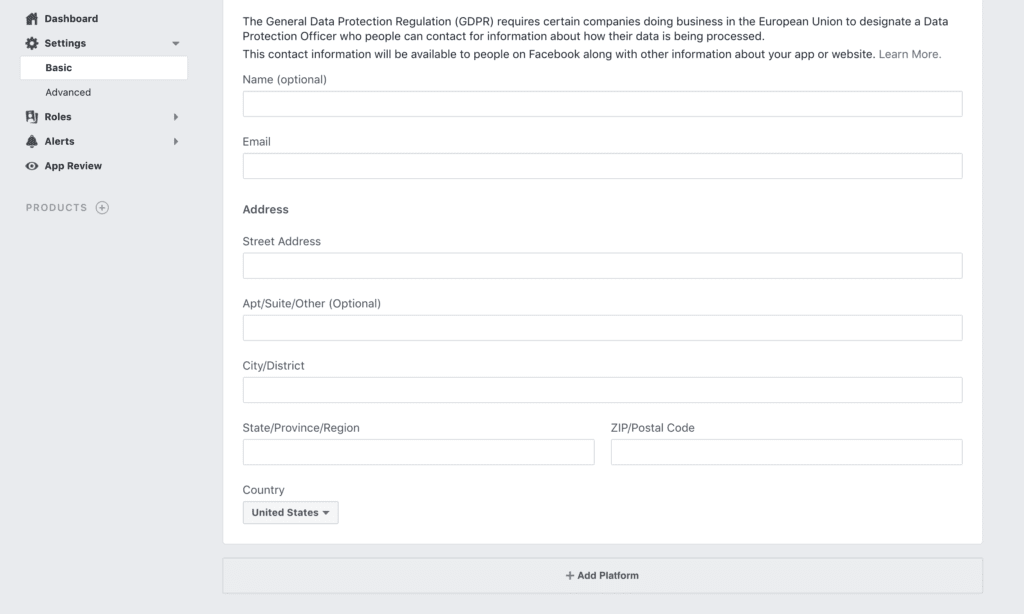
Click Add Platform
On the popup which appears, click Page Tab:
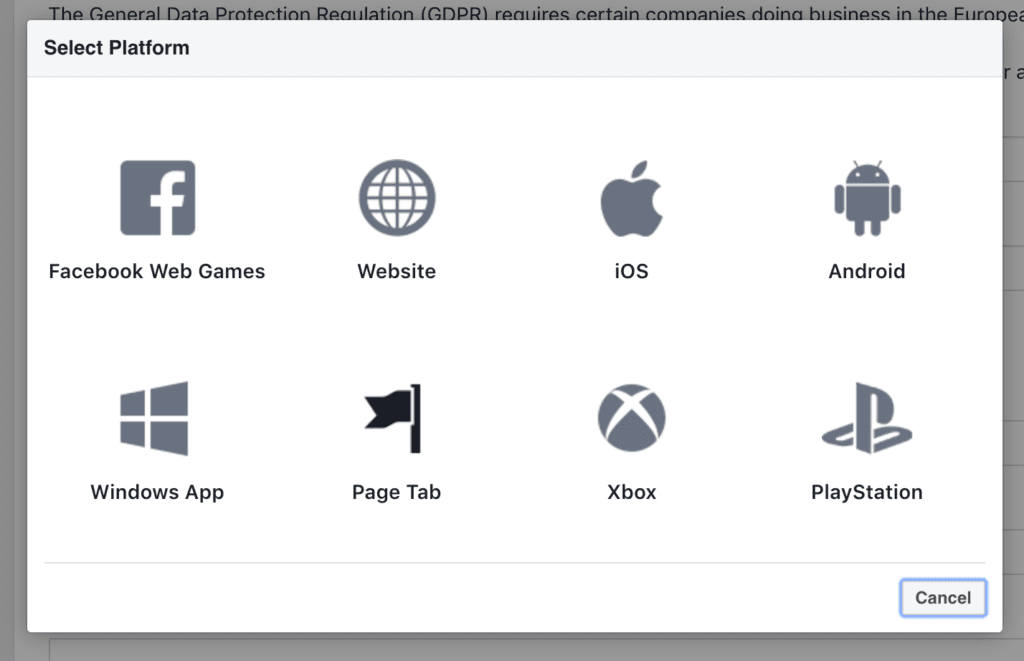
Select Page Tab
Step 4 – Enter Page Tab URL and details
You will then be taken to a box where you need to enter the secure URL of the custom page you would like to display (Secure Page Tab URL), along with the other details promoted (you can also add a tab image):
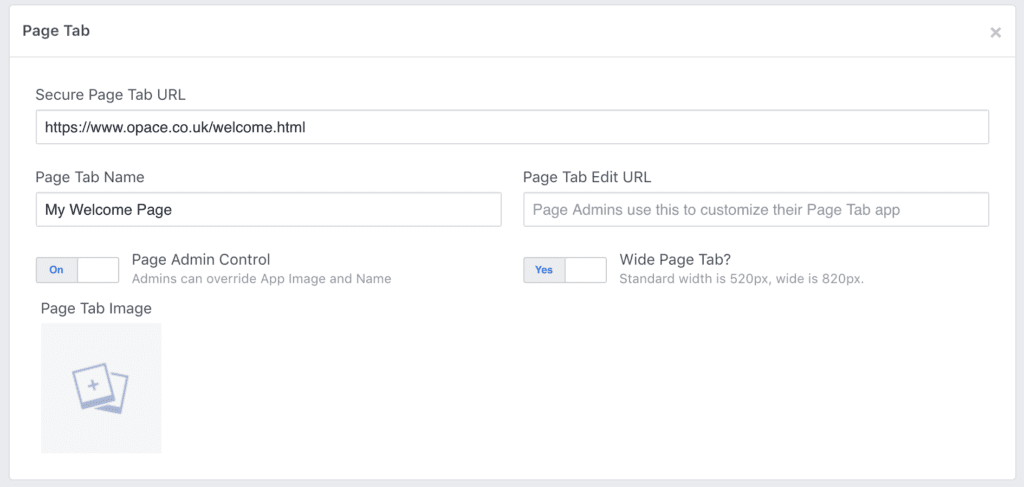
Secure Page Tab URL and other settings
When you have added the details, click the blue Save Changes button at the bottom.
Step 5 – Add the tab to your Facebook Business Page
This part feels as though it should be more intuitive as the process does involve some copy and pasting.
You will need to open a new tab/window within your web browser and enter the below URL, replacing APP_ID and URL with yours:
http://www.facebook.com/dialog/pagetab?app_id=APP_ID&next=URL

Copy the ‘App ID’ into the URL

Copy the ‘Secure Tab URL’ into the URL
When you load your URL in the browser, you will be promoted with a screen similar to below where you can select your Facebook Business Page from the dropdown menu:

Click the blue ‘Add Page Tab’ button and you’re almost done!
Step 6 – Organise your tabs into the correct order
Now you’ve added your custom tab to your Facebook Business Page, you will automatically see the tab listed on your Page.
The tab will usually appear at the bottom of the existing default list of tabs but you can organise these from within your Page, by clicking Settings > Templates and tabs.
By default you will see something like below:
- Home
- Services
- Reviews
- Shop
- Offers
- Photos
- Videos
- Posts
- Events
- About
- Community
- Jobs
Then by dragging and dropping the tabs as necessary you can put them into the correct order:
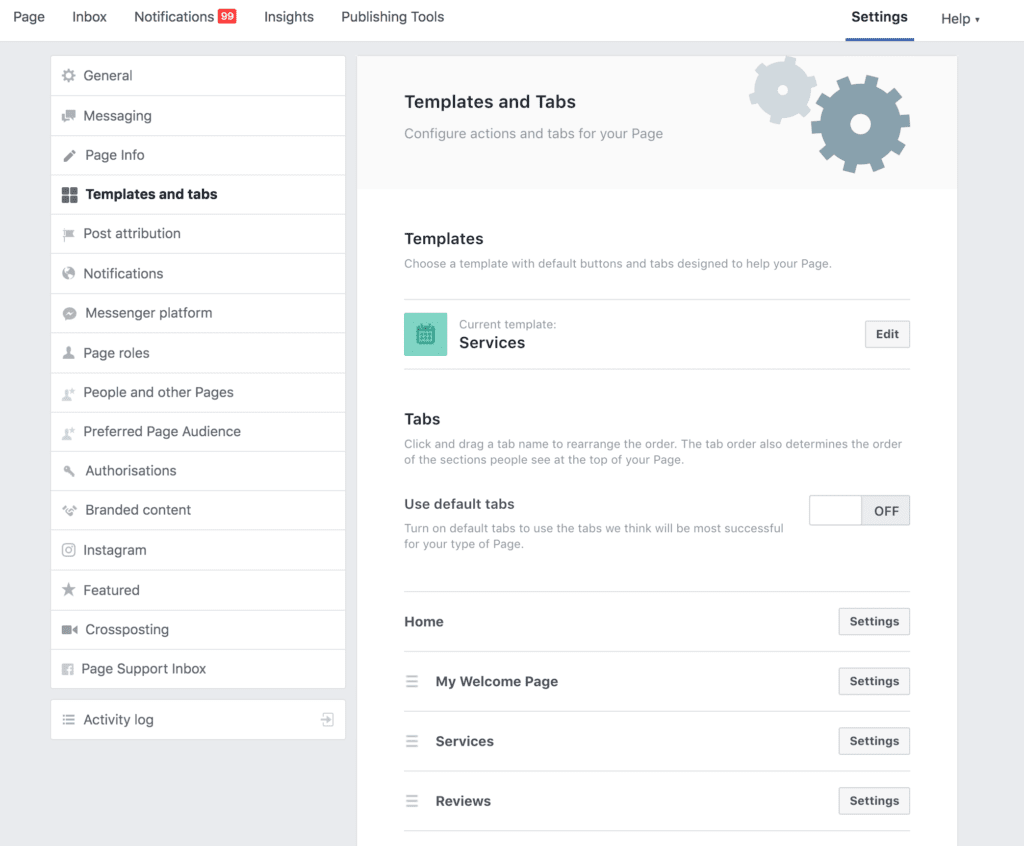
Organise your tabs into the correct order
My Facebook Welcome Page example
In my example, I’ve moved my custom welcome page to the top of the list, as can be seen below. For the purpose of this example, I’ve added a very simple headline:

My custom welcome page
For more information changing or customising your Facebook tab or welcome page, please read our next post here.
Conclusion
Hopefully you’ve found our updated tutorial as useful as our previous 2011 version. If you have any questions, please let us know by submitting a comment below. Alternatively, please share if you found this useful.
— 2011 process for installing static HTML iframe tabs (for informationly) —
This is one of our series of social media marketing video tutorials that we’re planning to roll out over the next few months covering Facebook, YouTube and LinkedIn. Last month we released some great video tutorials on Twitter Marketing, so if you found these useful we hope you like our latest videos.
How to install a Static HTML (iframe) tab is an intermediate guide to Facebook, designed for people who are familiar with Facebook’s basic settings. In this easy to follow guide we will show you how to successfully install a Static HTM: iframe tab onto your business page. If you found this tutorial helpful then please LIKE or leave a comment below. Remember to watch this space as we will be releasing Facebook video tutorials on the following hot topics over the next couple of months:
- How to create a Facebook account
- How to setup your Facebook profile
- How to upload photos and videos to Facebook
- How to add Facebook friends and create lists
- How to change your Facebook username – Vanity URL
- How To Create Facebook Groups & Events
- How to use Privacy settings
- How to create a Business Page (Fan Page)
- How to use Facebook polls
- How to install a Static HTML (iframe) tab
How to Change a Custom Tab, Welcome Page or Static HTML (iframe) on Your Facebook Business Page
Video Transcription
Hello, and welcome back. In this video I’m going to be showing you how to install a Static HTML (Iframe) app, and basically an iframe app allows you to embed any webpage into this particular tab on Facebook. So once you’ve installed it you can then customise it or edit it, and you can use various programming languages such as HTML, CSS and Javascript. So to install the app you go up to the top and type in “Static”. Now normally when you type in “Static’ it brings it up. It will say, ‘Static HTML: iframe tabs”. So if that comes up, just click that one. And it’s grey box with a star in the middle, so you want to click “Add Static HTML to Page” and then you need to locate the page that you want to add it to and click on that one. And then it’s going to ask you if you want to add the Static HTML, and we’ll click on that. And voila! There we go. That’s been added to this page. Now one way of knowing for sure that you’ve installed it, is to just scroll down, just below the avatar, and you’ll see, it’s normally “Welcome” it says, but obviously you can change the name of it at a later date. So if we click on the “Welcome” tab, and it loads up, there were go. You’ve got two different areas. So the first area you can programme HTML, CSS or Javascript, but this is for non fans so when people come to your page this is what they’re going to see first. And the one below it is optional, but this is for fan content. So imagine they’ve come to your page and they’ve seen the information here, then they’ve clicked “Like” and as soon as they’ve clicked “Like” then they come to this information that’s been programmed here. Now once you’ve put in the information you can preview it and you’re good to go. And in the next video I’m going to be showing you how to customise your iframe tab.
Editor’s Note: This post was originally published in 2011 and has been updated to reflect the latest guidelines from Facebook on how install a Page Tab.
Originally published in December 2011, updated October 2018


the developer link is not working
When adding URL I get error saying that it can’t be a facebook URL. Please help